3. Credits Spreadsheet
The spreadsheet files in the project folder house your credits alongside some important metadata. You can have multiple spreadsheet files, and each one can in turn host multiple credits sequences by having multiple worksheets (e.g., one per episode of a TV show).
The file may either be a local xlsx/xls/ods/numbers/csv file, or a url/webloc shortcut that points to an online Google Sheets, Nextcloud, WebDAV, or EtherCalc table.
To change the format, simply swap out the spreadsheet file. For example, to change from a local to a Google Sheets project, just upload your local xlsx/xls/ods/numbers/csv file to Google Sheets, put a url/webloc shortcut to the Google Sheet into the project folder, and finally delete the old spreadsheet file.
Towards the top of the spreadsheet, you’ll find the table header, which defines the following columns:
| @Head | @Body | @Tail | @Vertical Gap | @Content Style | @Break Harmonization | @Spine Position | @Page Style | @Page Runtime | @Page Gap |
|---|---|---|---|---|---|---|---|---|---|
This article explains the meaning of each column, as well as all other aspects of the spreadsheet. For conciseness, the example tables omit columns that are irrelevant.
Head-Body-Tail Blocks
A person’s name often times doesn’t stand alone. Most likely, it’s accompanied by a role name, job title, or some other prefix or suffix. Sometimes, multiple people share the same job title (for example in a list of extras).
Cinecred models all this via so-called head-body-tail blocks. Such a block consists of an optional head text, an arbitrary number of body texts, and an optional tail text. Here are some example blocks as they would appear in the spreadsheet.
-
A standalone actor block on a title card could have a single body cell with the actor’s name:
@Head @Body @Tail Alex -
A single credit block could have the head “Gaffer” and a single body cell with the gaffer’s name:
@Head @Body @Tail Gaffer Gustav -
A drivers block could have the head “Drivers” and one body cell for each driver:
@Head @Body @Tail Drivers Dominic Detlef Dora -
A song block could have the song title as its head and one body cell for each credit line:
@Head @Body @Tail Loremium Ipsumium Written by Cicero Dedicated to Brutus Pilfered by Some 60s Typesetter -
An opening title block could have a single body cell with the director’s name and some enclosing words in the head and tail:
@Head @Body @Tail A Dirc Film
The head, body, and tail may contain manual linebreaks, which will then show up as-is in the credits.
Tags
Sometimes, it’d be nice to insert a blank body cell. Simply leaving an empty cell would however split the block in two. Instead, use the “{{Blank}}” tag:
| @Head | @Body | @Tail |
|---|---|---|
| Ada Amazing | ||
| {{Blank}} | ||
| Ben Baffling |
As you will learn later on, the look of text is governed by letter styles. To change the letter style of the head, body, or tail mid-text, use the “{{Style}}” tag. It either applies a specific letter style (“{{Style X}}”), or resets to the initial style (“{{Style}}”):
| @Head | @Body | @Tail |
|---|---|---|
| Copyright © 2023 {{Style Name}}Callie Cash{{Style}} and {{Style Name}}Molly Money |

Pictures & Videos
Instead of text, a body cell can also contain a picture or video from the project folder or any subfolder. For example, to insert Cinecred.svg and Blooper.mkv, write:
| @Head | @Body | @Tail |
|---|---|---|
| {{Pic Cinecred}} | ||
| {{Video Blooper}} |
As you can see, you may omit the file extension. Once added, you will be able to configure the picture or video in the styling panel. To separately configure multiple appearances of the same picture or video, append a qualifier:
| @Head | @Body | @Tail |
|---|---|---|
| {{Pic Cinecred XXL}} | ||
| {{Pic Cinecred Petit}} |
Image sequences are also supported. Suppose there’s the following sequence in the project folder:
-
My Project
-
Vanity Card
- Vanity Card.0000001.png
- Vanity Card.0000002.png
- Vanity Card.0000003.png
- …
-
Vanity Card
To include it, refer to the name of the sequence folder:
| @Head | @Body | @Tail |
|---|---|---|
| {{Video Vanity Card}} |
Vertical Gaps
You declare vertical gaps between blocks directly in the spreadsheet. An empty row automatically constitutes a vertical gap of 1 unit. Alternatively, you can manually enter a vertical gap in between two blocks, which overrides the automatic gaps:
| @Head | @Body | @Tail | @Vertical Gap |
|---|---|---|---|
| Crew | |||
| 1.5 | |||
| Sarah Supervisor |
A vertical gap of 1 unit corresponds to some amount of pixels. You can configure this amount in the project settings. We advise you to set it to your main font height, but other choices are also valid if they aid your design.

Sometimes it might be necessary to specify vertical gaps directly in pixels. This can be done by appending “px”:
| @Head | @Body | @Tail | @Vertical Gap |
|---|---|---|---|
| Crew | |||
| 10px | |||
| Sarah Supervisor |
Content Styles
Cinecred needs to know how you want each block to be rendered. For example, while a job-person-block usually has the head (job) to the left of the body (person), a song has the head (song title) above the body (song details). And if there are multiple body cells, should they be put in a grid or flown dynamically? Should the body be interpreted as paragraphs? Which fonts should be used? And so on…
All these aspects and lots more are defined by content styles, which you configure in the styling panel. You then put the name of such a content style in the spreadsheet to assign it to all following blocks:
| @Head | @Body | @Tail | @Content Style |
|---|---|---|---|
| Crew | Heading | ||
| 1st Assistant Director | Sarah Supervisor | Gutter | |
| 2nd Assistant Director | Sandro Scheduler |

Spine Position
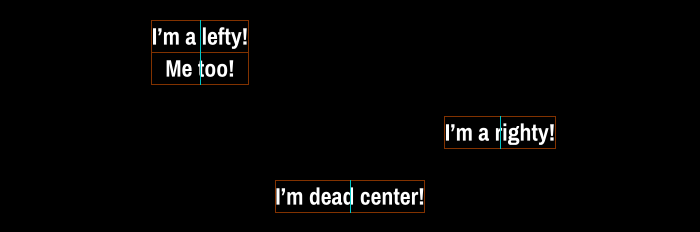
The spine is the vertical cyan line in the preview. Cinecred strings together blocks along it, one below the other. The spine is centered by default, but you can move it using the @Spine Position spreadsheet column.
On scroll pages, you move the spine left or right by specifying a horizontal pixel offset from the screen center:
| @Head | @Body | @Tail | @Spine Position |
|---|---|---|---|
| I’m a lefty! | -150 | ||
| Me too! | |||
| I’m a righty! | 150 | ||
| I’m dead center! | 0 |
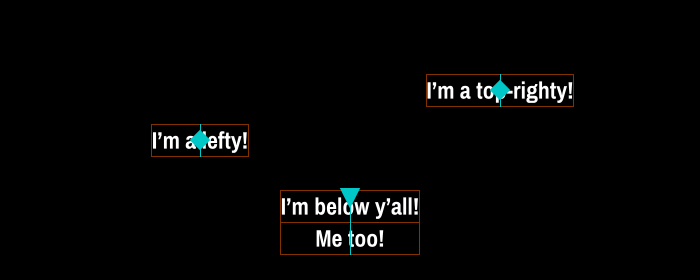
On card pages, you can move the spine to any position by specifying a horizontal and optionally vertical pixel offset from the screen center. This position will be marked as a small cyan diamond. By default, the spine will be vertically centered around the position, but you can append “Below” or “Above” to put the spine below or above it:
| @Head | @Body | @Tail | @Spine Position |
|---|---|---|---|
| I’m a lefty! | -150 | ||
| I’m a top-righty! | 150 -50 | ||
| I’m below y’all! | 0 50 Below | ||
| Me too! |
On both scroll and card pages, you can have the spine run parallel to the previous one by specifying a horizontal offset from the center and appending “Parallel”:
| @Head | @Body | @Tail | @Spine Position |
|---|---|---|---|
| I’m a lefty! | -150 | ||
| Me too! | |||
| I’m a righty! | 150 Parallel |

In cases where a simple “Parallel” is too limited, you can also arbitrarily arrange the spine in relation to a previous one. To do this, write “Hook”, followed by how many spines we have to walk back to reach the spine that the new one will be attached to. Then specify which point in the other spine (“Top”, “Middle”, or “Bottom”) should be connected to which point in the new spine. For example, write “Bottom-Top” to glue the end of the other spine to the start of the new one. Optionally, append a horizontal and vertical pixel distance between the connected points:
| @Head | @Body | @Tail | @Spine Position |
|---|---|---|---|
| I’m the root! | -50 | ||
| Hi, | |||
| me too! | |||
| I’m right beneath! | Hook 1 Bottom-Top | ||
| I’m a bit offset! | Hook 2 Middle-Top 250 | ||
| I’m with my friend! | Hook 1 Bottom-Top 0 200 |
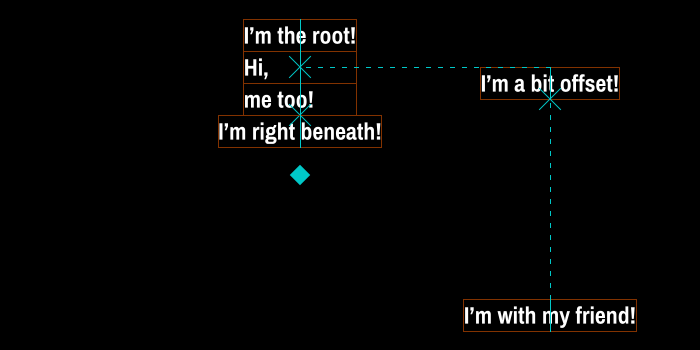
Notice that with both “Parallel” and “Hook”, the whole compound is positioned as one big unit, not just the root spine. For example, when you look at the cyan diamond in the image above, you see that the whole compound is vertically centered around the position (-50, 0).
Page Styles
Cinecred supports both title cards and rolling credits. The umbrella term for both is page. Your credits are simply composed of a sequence of pages. The behavior of each page (that is, whether it’s a card or a scroll, and details like the fade duration and scrolling speed) is defined by a page style, which you configure in the styling panel. The default template ships with two aptly named page styles: “Card” and “Scroll”.
In the spreadsheet, you indicate the start of a new page by putting the name of a page style there:
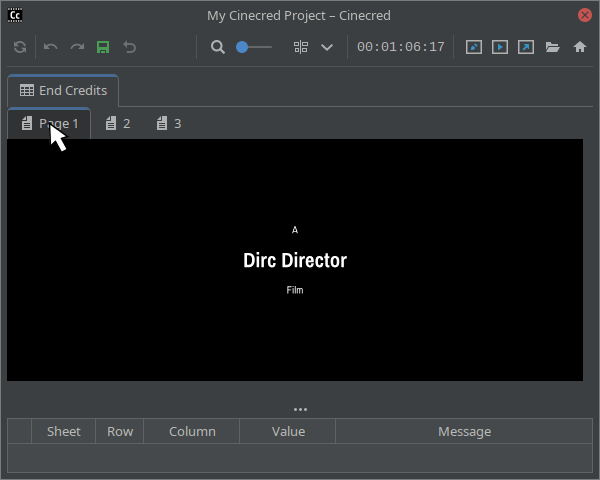
| @Head | @Body | @Tail | @Page Style |
|---|---|---|---|
| A | Dirc Director | Film | Card |
| Executive Producers | Callie Cash | Card | |
| Molly Money | |||
| Cast | Scroll | ||
| (in order of appearance) |
Page Runtime
This column sets the runtime (including fades) of a particular page, overriding all styling settings. When used on a scroll page, it shrinks or grows the vertical gaps to tune the runtime, just like the project-wide Runtime Fine Adjustment or the per-style Runtime Fine Adjustment.
| @Head | @Body | @Tail | @Page Style | @Page Runtime |
|---|---|---|---|---|
| A | Dirc Director | Film | Card | |
| Producer | Callie Cash | Card | 00:00:05:00 | |
| Tom | Johnny McRonny | Scroll | ||
| John | Ronny von Tommy | |||
| Gaffer | Gustav Gluehbirne | Scroll | 00:01:23:00 | |
| Key Grip | Detlef “Dolly” Driver |
You may also jointly tune any group of scroll pages. To do this, specify the runtime only for the group’s first page, but prepend a group name that you then reference from the group’s other pages. Notice that card pages cannot be included in a group.
| @Head | @Body | @Tail | @Page Style | @Page Runtime |
|---|---|---|---|---|
| A | Dirc Director | Film | Card | |
| Tom | Johnny McRonny | Scroll | Blub 00:02:42:20 | |
| John | Ronny von Tommy | |||
| Gaffer | Gustav Gluehbirne | Scroll | Blub | |
| Key Grip | Detlef “Dolly” Driver |
Page Gap
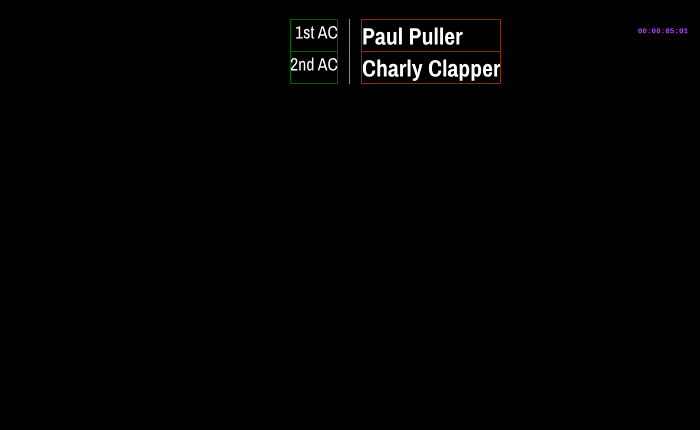
If you put a timecode into this column between two pages, the credits will show a blank screen between them for that amount of time, overriding the Subsequent Page Gap page style setting. Negative durations are also admissible and cause the next page to commence while the previous page is still running. For example, you could let a copyright title card fade in while the credits are still rolling out of frame.
| @Head | @Body | @Tail | @Page Style | @Page Gap |
|---|---|---|---|---|
| 1st AC | Paul Puller | Scroll | ||
| 2nd AC | Charly Clapper | |||
| -00:00:01:12 | ||||
| Copyright © 2023 | Card |

Alternatively, you can put “Fuse” here to absorb the two pages into a bigger page. For example, say that a scroll page is fused with a following card page. The scroll first commences as usual, but then at its end actually includes the card and stops on it; the card then takes over and finally fades out after its display duration has passed. You could use this feature to, for example, stop the credits roll on a final copyright notice, which then gracefully fades out.
| @Head | @Body | @Tail | @Page Style | @Page Gap |
|---|---|---|---|---|
| 1st AC | Paul Puller | Scroll | ||
| 2nd AC | Charly Clapper | |||
| Fuse | ||||
| Copyright © 2023 | Card |
Here’s the page preview for the above table both with and without fusion:
And here’s how the fusion looks in the final video:

By default, the scroll speed change between fused pages is quite abrupt. To make it smooth, put a transition duration timecode and a transition style behind “Fuse” (see example table below). The transition style determines how the scroll speed goes from full to 0 at the fusion point (or the other way around).
| @Head | @Body | @Tail | @Page Style | @Page Gap |
|---|---|---|---|---|
| 1st AC | Paul Puller | Scroll | ||
| 2nd AC | Charly Clapper | |||
| Fuse 00:00:02:00 Linear | ||||
| Copyright © 2023 | Card |

There is no limit to the number of pages you can fuse together. For example, you could have an elaborate sequence of cards and scrolls all fuse into a single page, which then looks like a single scroll that pauses multiple times.
And finally, here’s a neat trick. You can fuse a card with an empty scroll page and combine that with a negative page gap to make the card stop while the rest of the credits scrolls away:
| @Head | @Body | @Tail | @Page Style | @Page Gap |
|---|---|---|---|---|
| 1st AC | Paul Puller | Scroll | ||
| 2nd AC | Charly Clapper | |||
| -00:00:03:00 | ||||
| Scroll | ||||
| Fuse | ||||
| Copyright © 2023 | Card |

Break Harmonization (Advanced)
To understand this column, you need to be familiar with the family of harmonization settings found in content styles; namely Harmonize Column Widths and Harmonize Row Height for grid layouts, Harmonize Cell Width/Height for flow layouts, and finally Harmonize Head/Tail Width for heads and tails. As you know, these settings harmonize blocks all throughout the credits in various ways.
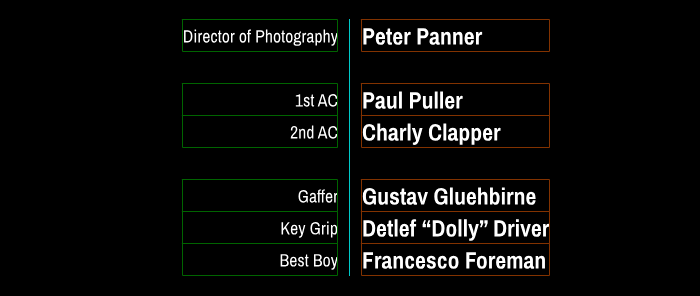
Now, what if you want the harmonization to not reach beyond a certain point? Say you’ve got two sections of gutter blocks on your page. While you’d like all head and body cells within either section to have the same width, this harmonization should not happen between the two sections. Well, simply put a space-separated list of “Head”, “Body”, and/or “Tail” into the @Break Harmonization column:
| @Head | @Body | @Tail | @Break Harmonization |
|---|---|---|---|
| Director of Photography | Peter Panner | ||
| 1st AC | Paul Puller | ||
| 2nd AC | Charly Clapper | ||
| Head Body | |||
| Gaffer | Gustav Gluehbirne | ||
| Key Grip | Detlef “Dolly” Driver | ||
| Best Boy | Francesco Foreman |